Pages

Tuesday, October 29, 2013

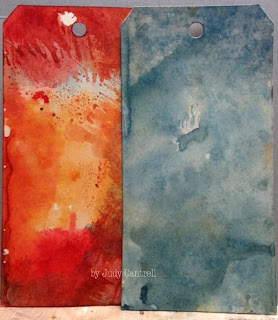
Technique Tuesday ~ Wrinkle-Free Distress


Welcome to Technique Tuesday!
By Judy Cantrell


Wrinkle Free Distress samples 

Instructions:
      1.)   Place non-stick craft sheet down on work table.
2.) Swipe one color of distress ink pads across the craft sheet, swipe another distress ink but don’t overlap. I usually apply two to three colors of distress ink.
3.) Use a fine mist water sprayer of water into the distress colors until you see droplets of color on the sheet.
4.) Press your tag into the wet ink. Start by rubbing your fingers over the back of tag to make sure the ink spreads. [Important: Do not move the tag around.]
5.) Then turn over and dry with heat tool.
6.) Next, go back in the ink, but this time drag the tag into desired colors.  Heat set each time you pick up color until you like the background you created.  This will give you a unique look. 

[To avoid plagiarism I used my own words on these instructions; otherwise as a quote from Tim Holtz.]

Monday, October 28, 2013

Altered Bottles

So much fun and easy to make!


Contact me directly for DecoArt Texture Glass Medium.
You can get the following products, except the Rattail Ribbon and the Glass Bottles at 
I used 
Alcohol Inks
Blending solution
Felt Applicator Pads
Wooden Applicator
Glass Bottles
Archival Ink Black
DecoArt Texture Glass Medium
Tim Holtz Die Mini Label Set
Tim Holtz Muse Tokens
Satin Rattail Ribbon
                                                                     Bakers Twine
Tim Holtz Classics #1 Stamps
Tim Holtz Tiny Things Stamps
Tim Holtz Black Soot Distress Ink
Ranger Distress Clear Rock Candy Crackle Paint
Vintage Pendants

Friday, October 25, 2013

Altered Box -Vintage style

Happy Friday!!!
This week has flown by!  I hope you've had a creative one.
 
One of my most favorite things to do is alter boxes.
I start by painting the edges-which in this case end up covered pretty good.  I used Tim Holtz vintage photo distress paint-it comes in a dabber bottle.  Works so well to go around edges.
Since the box top covers the bottom of the box-you don't want to put designer paper on the bottom edges-the box won't shut properly.  So the paper is only on the bottom
 
I collaged the top of the box.  Ripped pieces approximately 2x2 size.  Liquitex matt medium will glue is all down nicely.  Then is sprayed some  brown spritzer..


I had this wonderful trim from my stash.  Been itching to use it!  Use your hot glue gun to attach it all the way around your edges.
The pic below shows the glass feet I put on when I'm finished-use hot glue or glossy accents.

 I started layering.   had a dress form that I had mod-podged and inked up that I put a safety pin in, a spell binders die cut that was heavily inked around the edges.  A Christmas ornament frame that I gesso and repainted to antique it up.  I have a photo of a vintage girl inside. 
 and then flowers-several of them.  If I don't have the right color, I use watered down distress ink and paint brush and change the colors.  You can add stickles, distress inks, etc to doll them up.
The last flower I made with lace from my stash and a vintage button.
I hope this inspires you to take some plain and doll it up into a spectacular product! 

You can find the inks, paint dabbers, lace, prima flowers, designer paper, trims, glossy accents, and many more products at our store Outlaw Women Scrapbook Emporium.  The prices are 20-25% lower than retail EVERY DAY!!!!!

Have a blessed day!
Karen Conner

Tuesday, October 22, 2013

Stencils and More

My tags started out as an 8 x 10 inch Gelli Printed page. Three tags were cut from one page using a #8 tag as a template.

These are two of the tags.

Using one of the tag as my example I applied the paper to a #8 tag with adhesive. When dry, 
I inked the Papillon butterfly stamped image with archival black, immediately added clear embossed powder and then heat set. 
Next,  I added vintage photo distress ink around the edges of tag, heat set.
Stamp Papillon background image with wild honey distress ink over tag, heat set. 

Here is the finished tag, I've added three words from Tim Holtz chit chat booklet to finish this tag. 


Monday, October 21, 2013

Halloween Layout!

See how to make a realistic tombstone!


Here's some photos!


You can find these products at Outlaw Women Scrapbook Emporium


Friday, October 18, 2013

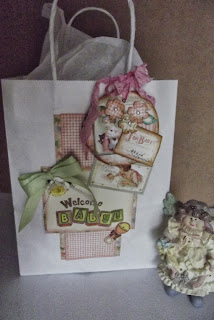
Easy Gift Bag Idea

I'm still so in love with Graphic 45 papers!!  I had a baby gift I needed to wrap.  Who buys wrapping paper anymore?  I had some plain white gift bags.  Thought I'd use the G45 Little Darlings Paper.

The Welcome Baby stamp is from Inkadinkado.  Some seam binding and fussy cutting -VIOLA'
You have a beautiful baby gift bag!!

You can find Graphic 45, Inkadinkado, seam binding, flowers, adhesives at our store

Outlaw Women Scrapbook Emporium


We've also got a huge batch of CHRISTMAS paper, stamps, etc.  Some of the top name brands too!

Have a wonderful Friday!!
Karen Conner


Tuesday, October 15, 2013

Technique Tuesday ~ Distress Re-inkers


Welcome to Technique Tuesday
by Judy Cantrell


This week I’ll share how to make a tag using a variety of Tim Holtz stamps, re-inkers and supplies.

1. Add several drops of Tim Holtz blue sapphire, peeled paint, wild honey and barn door Distress Re-inkers down in rows on craft sheet. Keep each color separate.

2. Pick up your tag; hold the tag at the top and drag or pull the tag through the Distress Re-inkers until you like the results.

My own notes: With the technique you will get the best results using a smooth finish tag. I make my tag using 14pt. file folders. [This is my own way to checking to feel how smooth the paper is; I run the paper or cardstock over my lips. If it feels smooth I use that side of the paper. Check it out you will be surprise how well it works!]

3. Heat set to dry.
4. Ink stamp with Adirondack Acrylic Paint Dabber [Snow Cap.] Stamp over the background. Let dry.
5. Ink and stamp butterflies with Archival black on the tag. Let dry.
6. Add Frosted Lace Stickles on three smaller butterflies. Let dry.
7. On small piece of white cardstock, stamp large butterfly with embossing ink add black embossing powder pour off extra; heat emboss. After it cools, cut-out butterfly and adhere body to the large butterfly.
6. Ink Tim’s foam stamp; letter b with black dabber paint and stamp on tag. Add the soar idea-ology to tag. Add fibers to finish.


To avoid plagiarism I used my own words on these instructions; otherwise as a quote from Tim Holtz.]

Monday, October 14, 2013

Fall ATC Cards!

Play along with me!


The Fall ATC card finished:


Remember the bony hand from last week? Isn't this just too cool!


Friday, October 11, 2013

Canvas Art-secret is layers!

I love doing backgrounds.  All the layering it takes-makes each one unique.
So grab you a canvas and lets get started!
First step-pick some sturdy designer papers.  Rip in chunks.  Probably the size of your palm. apply them to your canvas using Liquitex matte medium or mod podge-whatever you have.
Second step-dab some matching acrylic paint around in spots.  If you saw this canvas up close-you can see the paint is translucent and the designer paper peeks thru.  You don't cover it all up anyway.
Third step-get out some stencils or bubble wrap.  I used my paint brush and dabbed paint on top of my stencils using white acrylic paint. (that is opaque and will cover well)
Dry well each layer-forgot to add that!!  You'll have a fat mess if you don't.
Fourth step-grab you some stamps.  I particularly love the word stamps.  I stamped them on with black stazon ink.
Fifth step-I wanted it to be soft looking so I added a watered down layer of gesso real heavily. I let it set on the canvas for one minute and this dabbed at it with a wadded up paper towel to remove some of the excess.

My heart was free hand cut from a piece of cardboard.  I tore some of the top layer off so the ribs would show, added a layer of gesso. Then layered with gelatos.
when using your gelatos-remember they are activated with water.  You can use it or not.  I spritzed some onto my craft mat and used my finger to massage into the colors to blend them.

The words were cut out using my cricut machine.

My girl was free hand drawn onto a piece of book paper. Cut her out and glued her down with Liquitex matt medium.  Painted her in using acrylic paints.  I show that in detail on another Friday post! You'll have to come back for that!!

To finish the canvas, I used a sponge and went around the edge with some brown acrylic paint. Gave it lots of depth.

I hope your inspired to create you a canvas.

If you need any of the supplies I used-or any other supplies you need-check out the store

OUTLAW WOMEN SCRAPBOOK EMPORIUM
- WHERE EVERYTHING IS 20-25% LESS EVERYDAY!!!

Have a blessed Friday!
Karen Conner
Tuesday, October 8, 2013

Water Stamping


Welcome to Technique Tuesday!!
By Judy Cantrell


Supplies:
Craft sheet
Distress inks
Embossing ink
Archival ink
Stamps
Ink blending tool with foam applicator
Tag or cardstock with smooth finish
Heat tool
Mini-mister
Water

Instructions:       
  1. Start with a craft sheet down on work table. Next, ink your blending tool with distress ink; start on the outside edges working in a circular motion.
  2. Continue inking using various distress inks until you are pleased with the results.

Note: Tim’s suggestion; use inks with bold deep colors for best results.

  1. Ink your stamp with embossing ink.
  2. Mist your stamp with a fine mist water sprayer. This is where it might take a few tries to get just enough water on stamp.
  3. Press stamp down on your distress inked background. Lift off immediately dry the wet image using a heat tool. As the image dries your water stamping image appears.
  4. Finish using your choice of embellishments and stamps.  

To avoid plagiarism I used my own words on these instructions; otherwise as a quote from Tim Holtz.]