Technique Tuesday
Created by Judy Cantrell
I was inspired this week to start an envelope book and share with you these simple instructions.
This idea came to me on the 4th of March, yes, this article will be up tomorrow. So, I'm just sharing what I've done so far and a little bit of stuff I'll add to these six envelopes. I see right now I need a few more envelope books to house all of my papers, stamped images, ephemera, clip art, vintage photos, inkjet and lazer family photos.
This is a simple book to make;
To make one book, select six envelopes the same size.
Place two envelopes down on table with the envelopes together flat of table with both flaps on opposite sides. Take your roll of wash tape and start tape at top and roll the tape down the center of the two envelopes, (my tape was raised up and down until I got an even amount of tape on both sides of envelopes,) when you get to the end of the envelope turn both envelopes over and run the washi tape down the other side of envelopes, trim and smooth tape. Do the same to the other two pairs of envelopes.
Stack these three pairs of envelopes one to top of the other. Wrap binders twine around center stack of envelopes and tie the pages together. (See photo)
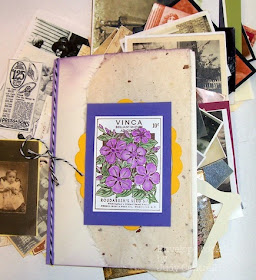
I'm working on my front, this is what I've made so far.
The cover was made with the stamped image, papers and handmade paper from this stash.
Supplies in club:
Created by
Judy Cantrell
Judy Cantrell


That is really cool and I love the simple design. I been doing this on some lever arch files of mine to put some style on them.
ReplyDeleteBeautiful Judy!
ReplyDeleteSuch a cool idea...can't wait to see more!
ReplyDeleteThis comment has been removed by a blog administrator.
ReplyDeleteFabulous Idea!! and so simple too. I have to give this a try. Great work!
ReplyDelete