Showing posts with label Spellbinders. Show all posts

Friday, January 4, 2013

Friday Feature - happy new year

Hello, friends.  It's Melody here with another Friday Feature.  I normally make my own Christmas cards to send out, but every few years, I just don't get them done.  This was one of those years.  As an alternative, I decided to send out a some New Year cards.  Since this is the only paper crafting I've done this week, other than a couple of cards for my class next week, I thought I'd share it with you.  It's a very simple card, since I was making a bunch of them. 

My card base is light aqua and the sun and hill both started as white card stock.  Along the top and sides of the card base, I sponged turquoise and blue to give the look of the sky just starting to lighten at sunrise, with that lighter glow around the sun.

The sun is Spellbinders lotus pendant die.  To make it easy to release the card stock from the die, I used wax paper between the die and card stock.  I then added mustard seed and spiced marmalade distress inks to the sun with a sponge applicator.

For the snowy hill, I cut a curve freehand and then embossed the piece with musical flourish embossing folder from Provo Craft.  I added light aqua ink to highlight the raised embossing.

I glued on the sun and hill, and trimmed off the excess hanging over the edge.  The sentiment (SU) is stamped in jet black archival ink.

Some of the products used can be found at Outlaw Women Scrapbook Emporium.

I want to wish you all a Happy New Year, and, as the sentiment inside my card says, "
May God
bless this trip
around the sun
with joy and
many amazing
moments.
 Thanks so much for stopping by today. 

Friday, November 16, 2012

Friday Feature - no turkeys allowed

Hello, friends.  Melody here with another Friday Feature.  A year ago, Tim Holtz posted a tutorial on his blog for making turkeys from his rosette dies.  At the time, I didn't own any of the rosette dies.  But I absolutely adored his turkeys and knew that I wanted to make some, so that meant I needed to purchase those dies.  Well, I now have both of Tim's rosette dies, but I still haven't made any turkeys. 

Thinking about perhaps making some turkeys for the Thanksgiving table this year, I suddenly got the idea that I could use the same technique, but make a peacock instead.  I checked the internet for a picture of a peacock, so I'd get at least some of the features recognizable, and proceeded to make a peacock.  I followed Tim's instructions, using some blue and turquoise papers and sponging on some brilliant blue and pacific point ink. Since his template for the turkey head has parts that distinguish it as a turkey, I trimmed those off, and then used a copic marker to color it blue.  I could have used blue card stock, but that would have meant tracing and cutting a second head (lazy). 

I wasn't sure what to use for the tail feathers, but again wanted something that would be fairly quick and easy.  I decided to try one of the flowers from the tattered flowers die.  I cut three, not knowing how many 'feathers' I would need.  I sponged around the edges with pacific point ink.  For the dots, I pulled out a new pencil and used the eraser as a stamp.  Then I cut all the petals off the flowers.  On the end that would be glued, I squeezed the sides together so they could conform to the shape of the folds on the rosette, and then glued one feather to each of the outside folds.  Perfect peacock feathers!

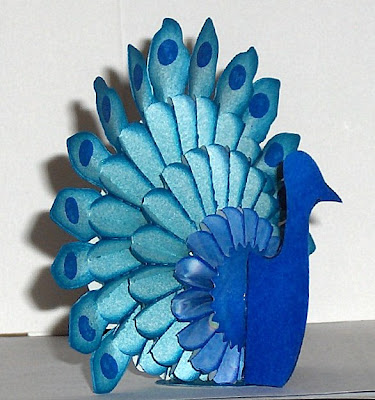
I was so excited that it actually turned out like what I had in mind!  That doesn't happen too often.  One change I might make, if I make another one, would be to add another row of feathers attached to the middle rosette, but since I already had that part all glued together, it would have been difficult to insert the feathers between the rosettes, so I opted to leave it with just a single row.  It's possible that a second row of feathers is too much.  At this point, I just don't know and can't quite visualize how it would look, and whether or not I would like it. 

Although you can't see it, I die cut a scallop circle and added it on the back to finish it off and cover the ends of the feathers where they are attached. 

Some of the products for making this project can be found at the OSWE store

I hope you enjoyed my project.  Thanks for stopping by. 

Friday, October 19, 2012

Friday Feature - Ornament

Hello, friends.  My name is Melody Schwartz (otherwise known as lacyquilter on the internet).  I'm so excited to share with you that I've been invited to do a regular Friday Feature here on the OWSE blog.

Today I have a simple Christmas ornament to help you get ready for the holidays.  I used the larger Tim Holtz rosette die, but these could easily be made with the smaller ones as well.  Since I wanted my ornament to shine, I knew I needed to use something different than regular card stock.

For each ornament, I started by cutting two pieces of thin card stock 2"x12" and then covering one side on each piece with silver foil tape.  I used an alcohol ink applicator with alcohol inks to coat the foil side, and then ran it through my die cutting machine with the rosette die.  I made one using red pepper and cranberry, one using denim and sail boat blue, and the third I left just silver.  I used hot glue to make the rosettes.

Because I wanted the ornaments two sided, each is made up of two rosettes, plus scallop circles in the center, making them more sturdy.  The centers are made from glossy card stock, also coated with alcohol inks, cut with a petite scallop circles die from Spellbinders, with the two layers glued back to back.  It was much easier to use a flat center than to try to glue the two rosettes back to back.  The centers on the silver one are left white.

Some silver cording made my ornaments ready to hang on the Christmas tree. 

Most items to make these ornaments can be found at Outlaw Women Scrapbook Emporium.  Thanks so much for stopping by.