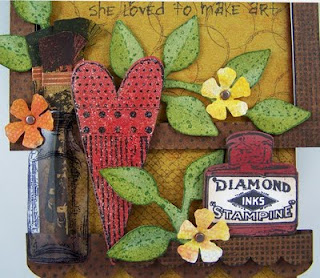
First Cut out your Cardboard to the size you want it to be. In this case I cut it at 3x5. Then tear out the insides so that the cardboard looks likes stripes going down. Or that it has been embossed.
After I got it the way I wanted it to look I then painted it with Distress Stains.
You can use Acrylic Paint if you want. Just give it an all over coat.
I then took this wonderful Product called
Rub n Buff
and using very little on my fingers I
put it on the lines going down and a little bit in the crevices.
this gives it that aged look.
Warning! just put a tiny amount on your finger. It goes far..
The Rub n Buff color I used was Gold Leaf.
As I do with most projects I do I went around the edge with
my Distress Ink "Walnut Stain"
I always do this because it makes the piece look aged..
Browning the edges give an old used look..
Maybe I should brown my edges .. I'm old and used!! ROFL!!
I printed off my Image at this point..
I buy a lot of my Digital Images from
Her prices are reasonable for digital Collage sheets.
I buy Digital because I can re-size the image to what ever I need.
I also can cut out one image from the sheet instead of printing the whole
thing out.
The program I use for this is Paint Shop Pro.
Years ago I taught how to use this program
when I did my Signature Tags..
oh here I go off the subject again.. LOL
Back to my piece.
I like to color my flowers to fit my pieces..
I also wanted a shimmering look so I used Perfect Pearls to color with.
I used white flowers from Petaloo
They have a line called
Color me Crazy
A little tip about using the perfect pearls to color with..
I spray some water onto my Craft Mat with a Mini Mister
then I dab a small paintbrush in the Perfect Pearls and add it to the water on my mat.
I'm working directly from my Crafts Mat. Mixing the Perfect Pearls into the water
and applying it to my flowers..
The Petaloo Flowers seem very limp when wet but they dry nice and hard so you
can add them to your piece and they won't tear or rip..
I glued my image down using a
Uhu Glue Stick
I have tried a lot of different glue sticks and have found Uhu to be
the best for this type of work..
It is fast to dry but will let you move the piece around while your placing it..
I don't like a glue that dries too fast. I am always needing to figure out where
I want to place my image and need the time..
Uhu Glue comes out blue but dries clear..
Trust me on this I have tried many glues.
You should see my shelf full of different glues... LOL
On my computer once again in the program
Paint Shop Pro I created the saying I wanted to use
and printed it off.
Cut it into pieces and yup I browned the edges of the little pieces
with Walnut Stain. I go over the whole word very lightly with the
Walnut Stain to give it an old look and it's not so white and glaring.
I wanted my words to pop out so I used
Foam Strips to adhere them.
I put my flowers together and added the small brad..
I did color my brad with Alchohol ink but it didn't take.
I then grabbed a Copic Marker.
My suggestion for this is to use the Copic Markers to color your metal brads.
The Markers do a wonderful job and I should have used them first..
Almost done at this point I wanted more more more.
I never know when to quit!! LOL
so I added the Vintage Lace to the bottom.
Adhering it with Glossy Accents.
I used to use my Hot Glue gun to adhere the lace on the bottom..
Then I went to the Glossy Accents once again to have the time
to place it where I wanted to.
I really think the Corrugated Cardboard gives it such a wonderful
Vintage Feel and it's a free substrate!! LOL
So that's it a nice and easy project that looks fabulous when finished..
Product List
Uhu Glue Stick
water - My Bathroom Sink
About the Uhu Glue Stick
OWSE can get these but we have to buy at least 12 at a time
I bought mine from Michaels
I didn't need 12.. LOL
Thanks for looking everyone
see you next week..


