Let's give a
Warm Welcome to Nicie Ibarra
she is our Guest Artist
on Wednesday Women
on Wednesday Women
My name is Nicie Ibarra and I have been crafting for about 15 years. I’ve been married to my wonderful husband since 1989, and we have two children. Our 21 year old son is attending college and our 17 year old daughter will be graduating high school this June.
I really enjoy working with paper, beads, wire, clay, and of course inks & paints. But, I have to admit that once I discovered Mixed Media, I was hooked!!! The main reason that I find Mixed Media so relaxing and rewarding is that I have always been the type of artist that had to “paint inside the lines.” In Mixed Media, it’s OK to paint outside the lines and add as much or as little embellishments as you want.
You can visit my blog at http://cardsandcraftsfromme2u.blogspot.com/for additional information or just to stop by and say hello. Thanks!

Oriental Themed Accordion Fold Collage Booklet
by Nicie Ibarra
This project started out as a tri-fold card and slowly evolved into an accordion fold collage booklet - J -but I’m very happy with the end result.
This is an eight panel accordion fold collage booklet. The covers measure 7” H x 4½” W, the inside pages measure 6” H x 4” W. The gold cord in the back wraps around the entire booklet and the front gold cord helps tie the covers closed. Both cords have porcelain beads at the ends.
Supplies:
· 12x12” card stock color of your choice
· Handmade or decorative paper of your choice
· Washi paper
· Cardboard or cereal box
· Coordinating cords or ribbons
· Beads of your choice
· Clip art of your choice
· Golden Acrylics – Bronze Yellow, Cadmium Red Deep Hue, Gold
· White glue
· Foam brush
· Score pad & tool
· Stamps
Prosperity (Hero Arts)
Tiny Longevity (Hero Arts)
Round chop (Kodomo, Inc.)
Small Longevity chop (Stampmagick)
Geisha (unknown)
Small Oriental text (Leveanworth Jackson)
Large Oriental text (Tin Can Mail Man)
Prosperity (Hero Arts)
Tiny Longevity (Hero Arts)
Round chop (Kodomo, Inc.)
Small Longevity chop (Stampmagick)
Geisha (unknown)
Small Oriental text (Leveanworth Jackson)
Large Oriental text (Tin Can Mail Man)
· Black Staz-On Ink Pad (Tsukineko)
· Verdigris Green Pigment Ink (ColorBox)
Instructions:
1. You will need 2½ pages of the 12” x 12” card stock, the height is 6” and the length is 12”.
2. Once cut, lay the paper on the score board (long ways) and score at the 4” & 8” lines – this will give you three panels.
3. Overlay the card stock, over one another, in order to make one continuous long strip of stock. Make sure you glue the edges carefully so they will not curl up.
4. Once you cut the paper & score it, you will have enough to make the eight panels of the accordion fold booklet.
5. Once all the panels have been glued and they have dried, you can begin transforming it into a beautiful collage or any art project you wish to create!
6. First, I added the bronze yellow color to the front and back of the panels. I intentionally left a few sections unpainted.
7. Once it dried, I added the red paint randomly.
9. Once the clip art and stamps were dried, I added a layer of the gold acrylic. I really like this Golden Gold acrylic because it’s very translucent. You can’t really tell there is a layer of color
until you move the piece and the light hits it.
Notice the difference in the pictures above.
10. Cut the cardboard to the desired size.
Tip: If you don’t have cardboard, you can use an empty cereal box. If you want sturdier covers, you can always add more layers but the cereal box works great.
11. Cut the decorative paper about ½” to ¾” longer than the cardboard, making sure that you can fold it over the cardboard’s edges.
12. Add glue with the foam brush around the cardboard’s edges and a light coat in the middle. Place the cardboard on the reverse side of the decorative paper making sure it’s in the middle of the paper.
Tip: Be sure not to add too much glue because it will take a long time to dry and will create a lot of air bubbles.
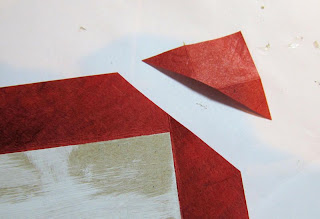
13. After placing the cardboard on the paper, cut the corners of the paper in an angle. Don’t get too close to the corner or you will have a gap between the cardboard and paper, exposing the cardboard. Glue the edges and fold down the tabs.
14. Now, cut a piece of coordinating paper making sure that it covers the exposed folded edges. Let them dry.
15. Once the covers are dry, you can add the cord or ribbon. You can punch a hole in the front & back covers or just add the cords before placing the top paper to the covers.
16. Add the beads to the ends of the cord. You’ve just created your own accordion fold booklet!!!
Thank you Nicie!


9 comments:
Absolutely beautiful work. Thanks for the tutorial :)
Cheers
Sharon
Fabulous work and great tutorial! Thank you for being our guest Artist this week.
Nicie, thank you for being our Guest Artist and sharing this wonderful tutorial!
Judy
Beautiful work!!
awesome job! Very pretty!
Can't wait to try this. Great tutorial. Thanks so much.
Sande
WOW this is so cool, Thank you for sharing with us
Thank you so much everyone for the kind words! I'm very glad that you all enjoyed the tutorial! :)
Stunning. Thank you
Post a Comment