Friday, June 28, 2013

Friday Technique; Altered box

Happy Friday!

Thanks for joining us here at Crafting with OWSE.  Today I'm going to show you the steps I took to alter a box I bought at Goodwill for 50cents.

 The first thing to do is paint the edges that will be seen with Gesso.  Measure and cut a piece of designer paper to fit around the box and on the bottom.  I glued them on with Glue and Seal.  Once dry, I distressed the edges with Tim Holtz distress paint Vintage photo.
 Using G45 French Country paper, I fussy cut several items.  Glued them to the lid using Glue and seal.  I added some vintage lace around the edge.
 I diecut a piece of cardstock and ran it thru my Big Shot and embossed.  Then cut a small piece of G45 and glued to the center.
 I fussy cut the rooster and glued to the opposite side.
You can buy all the products used today at our shop.
Click here Outlaw Women Scrapbook Emporium

Tuesday, June 25, 2013

Let's Sew


 I'll share a tag I made last week using Tim Holtz stamps and supplies. 
Tim's sewing image was inked with tea dye distress ink and while still wet I rubbed some of the ink off with a soft cloth to give a vintage look. 
Distress markers were used on some of the images.
The needle image was stamped and added to tag. 
Ace thread image was stamped on tag. 

 The hemp cord used on this tag reminds me of supplies I used years ago when I made all of the clothing except for jeans for my family. I also made sofa pillows, drapes, quilts and recovered chairs and sofas. Now, my sewing machine is used for craft and small sewing project. 
Highlighted images can be purchased in club at discount prices. 


Sunday, June 23, 2013

Friday Technique-late!


I wanted to share a new technique I've learned.  Uses tissue paper.

You start by stamping your image on a piece of plain white tissue paper. 
You crumble the paper up into a ball.  Squeeze it around.  You want wrinkles.
Gently open it up and position it over some white cardstock. 
I used the regular 5.5 x 4.25 size for the colored cardstock.  The white will have 1/4 inch less around the edges.

I think it's a pretty cool look.

Products used:
stamps-Stampin up and Market Street
Ink: coral, olive, celebration
cardstock
gluestick

Sorry my Technique Friday is late-I promise to be ON TIME next week!!

Have a super crafting week!

Karen

Tuesday, June 18, 2013

June Tag 2013

You can view Tim's tag here:
I used the supplies Tim used except for the stamp;
The background image is Tim's also, it's a mounted stamp I bought years ago.
I used Tim's Distress Paints and Distress Markers.  

Sorry for the short tutorial, I'll try again next week. 

Monday, June 17, 2013

Tattered Angels Faux Finish Fun

Tattered Angels has some new products that work together to create a faux finish. They are fun and easy to use. Come play with me!


Here is the close up of the Burlap Canvas piece:
And this is what I did with my piece I made for you in the video!


You can find the Tattered Angel Spray Systems and the inks, dies and some of the embellishments I used here:
Outlaw Women Scrapbook Emporium...never pay retail price again!

Tuesday, June 11, 2013

Altered Cake Box

Have you ever thought to turn an entire box from your pantry into an album or journal cover, that is what I did using a angel food cake mix. When finished it will be 5 1/4" x 7 1/4" and spine 1 3/4." 


Supplies: Golden paints, Kraft paper 
You can find both of these products in club: http://ididitcreations.com/club/


Directions:
Don't cut anything off, this will created a sturdy cover for your journal. Cut an additional piece of chipboard (box) and apply glue down the center, leaving space so the book with bend.
(See photo below, the white portion in spine is the additional piece)
Glue down all edges of box. 

Cut a piece of Kraft paper four inches larger than the size of your cover. Wad up the Kraft paper, smooth out, wad up again do this until the Kraft paper is soft, add a thin film of glue completely covering the kraft paper using an old gift card or credit card, adhere Kraft paper to box, trim corners, adhere extra to inside cover. Add another trimmed piece of Kraft paper to fit inside of book cover. Put something heavy on book cover until dry. 

After the Kraft paper has dried, it was ready to paint. I used Golden black paint on my Gelli plate to add a color on cover. And then I used a variety acrylic paints until I was happy with the results. I used a stencil with  the paint occasionally. I used my Gelli plate to paint the inside cover with the same paints after the cover was dry.

 I remembered Tim has the ring binder that would work for a quick journal, but it left holes with brads on spine, so I used three rows of black spine tape to cover up the brads.
If I do this again, I'll make the cover and then finish it with this tutorial I shared back in August 2011;
http://craftingwithowse.blogspot.com/2011/09/technique-tuesday-tag-booklet.html


Thanks for looking and have a nice day! 

Monday, June 10, 2013

Melt Art Playtime

This video is long today, but there is so much information!


Ran out of space on the card, so here is a quick conclusion!


Find many of these products at Outlaw Women Scrapbook Emporium!


Friday, June 7, 2013

Friday Feature: Canvas Mixed Media

It's time for Friday's Feature!  
Today I've used an 8x10 canvas.  I had painted it with acrylic paints.
Then I took some lace and started layering it onto the canvas using mod podge.
You need to coat the lace and the canvas really well.

After it's dry, I used some gesso and spray inks to make areas pop.

I had a frame from MME that I glued on with mod podge.  
To make my photo pop I used my finger to go around the edges with gesso.  I love that look!

Added a few embellishments: ribbon, Wild Orchid flowers, buttons.

You can purchase most of the items I used at our shop.  All prices are discounted daily. 
Check it out!

Outlaw Women Scrapbook Emporium

Thanks for stopping by today!!

Tuesday, June 4, 2013

Technique Tuesday 3-D Accordion Fold Card

3D Accordion Fold Card


Cut a piece of designer paper or card stock 6 1/4 x 5 1/2" 
and one white piece of card stock 5 1/2 x 8 1/2"
MS scoring tool
Ink pads
Movers and Shapers Rectangle magnetic die (large)
Fleur de lis and Eiffel Tower Alterations die
Eiffel Tower, French Script TF Embossing folder
Ink applicator
Scor-Tape
Vagabond or other die cutting tool 
Base Tray


Let's get started:
Using the first piece of designer paper listed above, place in a scoring tool or use a ruler and scoring tool and score twice on each end of rectangle. 1/2", 1/2" and then on other end 1/2", 1/2"

{I used a Martha Stewart scoring tool}

Fold accordion and then place everything in an embossing folder and run through die cutting tool. This will embossed the full piece included the folds. 
sample of embossing and inking


Use Tim Holtz magnetic rectangle larger die to cut a window in the accordion fold card front.
You will need to measure to get it equally spaced for cutout frame. I used Tim's ruler.

This is a closeup of the accordion fold


Second part
Fold white card stock 5 1/2 x 4 1/4"
Now, its time to stamp add die cuts or designs to create a card. To complete my card, I embossed Tim's Eiffel Tower embossing folder, added distress ink to highlight raised images, add distress paint to Fleur-de-lis. 
Die cut Paris image with chipboard, paint with vintage photo and black soot followed my clear embossing ink with clear embossing powder. Heat set.
Add Eiffel Tower to front inside and out of frame on top with adhesive.


To finished add  Scor-tape to accordion fold outside edges and onto folded card.  


There are lots of options how to complete this card. I felt like it needed something else and added flowers.

 Thanks Robyn! I used the flowers you sent recently in the Facebook drawing. 

Monday, June 3, 2013

Father's Day 2013

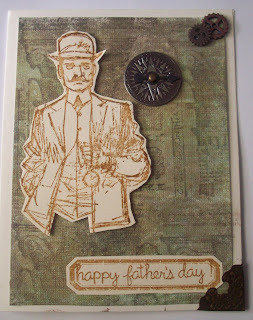
Here are some clean and simple Father's Day cards to make in just a few minutes time!


Here are some pictures of the completed cards.


You can find these stamp and inks and embellishments at Outlaw Women Scrapbook Emporium!