Hi friends. Melody here with your Friday Feature. May is always a special month for me. I have an anniversary, mother's day, and a birthday all within a week's time. Among the gifts I received were some distress paints.
I put some mowed lawn, salty ocean, and vintage photo distress paints on my craft sheet, and swiped a piece of white card stock through them. After heat setting, I spritzed some water on the paint on the craft sheet and put the card stock in it again, dabbing a couple of times till I was satisfied. I dried it and then die cut an arch with Arch Frame die and trimmed off the outer edge. I also die cut a navy arch with the same die.
I used some Tim Holtz stamps as well. Two are stamped in jet black archival. The third was stamped several times on the card base with salty ocean distress ink.
I added some doodling on the card base with a black Pitt pen.
I then inked only one of the pen nibs and stamped it next to the men. I used a craft nib holder & nib to color the pen nib with salty ocean distress ink. Then I painted some mustard seed distress paint on a piece of white card stock and cut out a candle flame. I hightlighted the flame with distress markers and made the pen nib into a candle.
Most of the products I used can be purchased from Outlaw Women Scrapbook Emporium.
Thank you so much for stopping by.
Showing posts with label atchival black ink. Show all posts
Friday, May 17, 2013
Thursday, April 25, 2013
Friday Feature - butterflies
Hi everyone. It's Melody here with the Friday Feature. Today I decided to make a background using a border stamp and distress markers. I used the circle border stamp from dylusions around the edge set, and stamped it several times on watercolor paper with jet black archival ink, until the paper was filled. I colored the circles with distress markers. Then I trimmed it down to fit an A2 card, and used a foam applicator to add vintage photo distress ink all over. I inked it a little darker along the edges. Then I attached it to a black card base.
I tend to be a lazy stamper and I didn't want to pull out my die cutting machine and dies if I didn't have to. So I rummaged around in my scraps and found a black butterflight on the edge die cut and a yellow mini butterfly die cut. Perfect -- I can work with these. I trimmed the border die cut to fit my card and added vintage photo ink on the edges of the butterfly.
For the sentiment, I stamped one from Just Thoughts (Tim Holtz) on white card stock and cut out a partial circle. More vintage photo ink and I put all the pieces together on the card. The butterfly wings are raised on dimensional foam tape.
Most of the products I used can be purchased from Outlaw Women Scrapbook Emporium.
Thanks so much for stopping by.
I tend to be a lazy stamper and I didn't want to pull out my die cutting machine and dies if I didn't have to. So I rummaged around in my scraps and found a black butterflight on the edge die cut and a yellow mini butterfly die cut. Perfect -- I can work with these. I trimmed the border die cut to fit my card and added vintage photo ink on the edges of the butterfly.
For the sentiment, I stamped one from Just Thoughts (Tim Holtz) on white card stock and cut out a partial circle. More vintage photo ink and I put all the pieces together on the card. The butterfly wings are raised on dimensional foam tape.
Most of the products I used can be purchased from Outlaw Women Scrapbook Emporium.
Thanks so much for stopping by.
Friday, April 19, 2013
Friday Feature - faux birch bark
Hi friends. Melody here with another Friday Feature. I have always loved the look of birch bark in crafts, but hate to hurt the trees to get pieces big enough to use. So I thought I'd see if there was a way to make a look-alike. I checked online for tutorials and didn't come up with much. Although there are a few, I wasn't really thrilled with the final product, but I did get some ideas.
I started with some brown paper bag. Since birch bark has a very matte finish, I decided to use my snow white paint dabber. But rather than using the dabber top, I simply opened the cap and poured some on the bag and used a foam brush to spread it, keeping my strokes all in one direction.
Once the paint was dry, I sponged on some tea dye and gathered twigs distress ink, and then proceeded to add LOTS of little black lines with a black Pitt pen.
I then inked up two stamps from Nature's Moments (Tim Holtz) with distress markers, spritzed with water, and stamped them on the 'bark'. The sentiment was stamped with jet black archival ink.
To give the bark an even more realistic look, I snipped the edges with a scissor and curled them with my bone folder, allowing some of the brown from the underside of the bag to show. I also used a distressing tool and mess the edges up even more. I really love how much it looks like real birch bark.
I glued it to a pacific point (SU) card base that matched the faded jeans really well.
Almost all the products used can be purchased from Outlaw Women Scrapbook Emporium.
Thanks so much for stopping by. I hope you'll try this technique.
I started with some brown paper bag. Since birch bark has a very matte finish, I decided to use my snow white paint dabber. But rather than using the dabber top, I simply opened the cap and poured some on the bag and used a foam brush to spread it, keeping my strokes all in one direction.
Once the paint was dry, I sponged on some tea dye and gathered twigs distress ink, and then proceeded to add LOTS of little black lines with a black Pitt pen.
I then inked up two stamps from Nature's Moments (Tim Holtz) with distress markers, spritzed with water, and stamped them on the 'bark'. The sentiment was stamped with jet black archival ink.
To give the bark an even more realistic look, I snipped the edges with a scissor and curled them with my bone folder, allowing some of the brown from the underside of the bag to show. I also used a distressing tool and mess the edges up even more. I really love how much it looks like real birch bark.
I glued it to a pacific point (SU) card base that matched the faded jeans really well.
Almost all the products used can be purchased from Outlaw Women Scrapbook Emporium.
Thanks so much for stopping by. I hope you'll try this technique.
Friday, April 5, 2013
Friday Feature
Hi friends. It's Melody with a new Friday Feature. I recently got some new Tim Holtz dies, so I thought I'd use some on my card.
I started by die cutting some watercolor paper with the movers & shapers cameo frame and ovals. I stamped the image (La Blanche) on the oval with jet black archival ink. Then I added some color wild honey, tea dye and spun sugar distress markers. I used an ink blending tool to add some tumbled glass and vintage photo distress inks to both the oval and the cameo frame.
Then I embossed the frame with wood grain texture folder. I went over the embossing with vintage photo ink to make the texture stand out.
The card base is a light aqua, to which I added some vintage photo around the edges. Then I glued the frame down and attached the oval with dimensional foam tape.
Next, I die cut the wreath on the regal crest die twice from navy card stock. I cut them apart at the center, so I could change the curve a bit to fit around the oval. After gluing them down, I die cut some buttons from a SU sweet buttons embosslit die. I added color with sponge daubers. Before attaching the buttons with foam dots, I pierced some holes in them and added thread.
Most of the products used on my card can be purchased from Outlaw Women Scrapbook Emporium.
Thanks so much for stopping by.
I started by die cutting some watercolor paper with the movers & shapers cameo frame and ovals. I stamped the image (La Blanche) on the oval with jet black archival ink. Then I added some color wild honey, tea dye and spun sugar distress markers. I used an ink blending tool to add some tumbled glass and vintage photo distress inks to both the oval and the cameo frame.
Then I embossed the frame with wood grain texture folder. I went over the embossing with vintage photo ink to make the texture stand out.
The card base is a light aqua, to which I added some vintage photo around the edges. Then I glued the frame down and attached the oval with dimensional foam tape.
Next, I die cut the wreath on the regal crest die twice from navy card stock. I cut them apart at the center, so I could change the curve a bit to fit around the oval. After gluing them down, I die cut some buttons from a SU sweet buttons embosslit die. I added color with sponge daubers. Before attaching the buttons with foam dots, I pierced some holes in them and added thread.
Most of the products used on my card can be purchased from Outlaw Women Scrapbook Emporium.
Thanks so much for stopping by.
Thursday, January 24, 2013
Friday Feature - bloom with joy
Hello friends. It's Melody here with another Friday Feature. I've been working on a monthly challenge at Motley Soul Mixed-Media Art. The challenge is to make 21 (4"x6") cards. This is actually my 21st card, although I do plan to make more, since I'm having so much fun doing them. I've been making mine two-sided, so the back side of this one is still blank.
I recently made an Inspiration Jar for myself. Although the idea is not original, I tweaked it to make it work for me. I've been reaching into my inspiration jar for ideas to get started on each card. For this card, I pulled out the words, black, stencil, and chipboard. I didn't use the word chipboard other than the card is made from cereal box chipboard covered with recycled coffee filters.
I started by painting the surface black. My paint dauber top is all hard and dried out, so I just opened the bottle and used a brush to spread the paint. Once the paint was dry, I used my mini bricks stencil (Crafter's Workshop) and, since I don't have any texture paste, I spread some light spackling through it. I've never used this stuff with a stencil before, so I guess I was a bit heavy handed, and some pushed underneath the stencil. The bricks are quite as defined as they should be, but that's OK. It dries very fast, so I proceeded to add color with a sponge and a number of different distress inks (tumbled glass, mowed lawn, mustard seed, spiced marmalade, picked raspberry, barn door, and seedless preserves), working gently, since I have no idea if the spackling is going to flake right off the card. So far, it seems to be holding. I hope it continues. I'll just have to handle it gently.
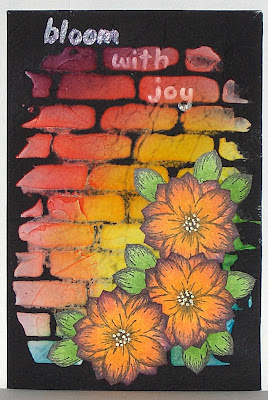
I stamped a bunch of flowers from Heartfelt Creations on a piece of white card stock with jet black archival ink. I heavily sponged several with spiced marmalade distress ink, cut them out, and then sponged the edges with picked raspberry distress ink. On three of the flowers, I removed some of the petals, so that when I placed them over the full flowers, the blossom looks fuller. Two flowers were sponged with mowed lawn distress ink. I cut the petals apart to make leaves. After figuring out an arrangement I liked, I glued the flowers and leaves onto the card. I then added some white dots in the center of the flowers with a white gel pen.
The sentiment was handwritten with a white galaxy marker.
Some of the products used to make this card can be found at Outlaw Women Scrapbook Emporium.
I'm really happy with the bright colors over the black background.
Thanks so much for stopping by.
I recently made an Inspiration Jar for myself. Although the idea is not original, I tweaked it to make it work for me. I've been reaching into my inspiration jar for ideas to get started on each card. For this card, I pulled out the words, black, stencil, and chipboard. I didn't use the word chipboard other than the card is made from cereal box chipboard covered with recycled coffee filters.
I started by painting the surface black. My paint dauber top is all hard and dried out, so I just opened the bottle and used a brush to spread the paint. Once the paint was dry, I used my mini bricks stencil (Crafter's Workshop) and, since I don't have any texture paste, I spread some light spackling through it. I've never used this stuff with a stencil before, so I guess I was a bit heavy handed, and some pushed underneath the stencil. The bricks are quite as defined as they should be, but that's OK. It dries very fast, so I proceeded to add color with a sponge and a number of different distress inks (tumbled glass, mowed lawn, mustard seed, spiced marmalade, picked raspberry, barn door, and seedless preserves), working gently, since I have no idea if the spackling is going to flake right off the card. So far, it seems to be holding. I hope it continues. I'll just have to handle it gently.
I stamped a bunch of flowers from Heartfelt Creations on a piece of white card stock with jet black archival ink. I heavily sponged several with spiced marmalade distress ink, cut them out, and then sponged the edges with picked raspberry distress ink. On three of the flowers, I removed some of the petals, so that when I placed them over the full flowers, the blossom looks fuller. Two flowers were sponged with mowed lawn distress ink. I cut the petals apart to make leaves. After figuring out an arrangement I liked, I glued the flowers and leaves onto the card. I then added some white dots in the center of the flowers with a white gel pen.
The sentiment was handwritten with a white galaxy marker.
Some of the products used to make this card can be found at Outlaw Women Scrapbook Emporium.
I'm really happy with the bright colors over the black background.
Thanks so much for stopping by.
Friday, January 4, 2013
Friday Feature - happy new year
Hello, friends. It's Melody here with another Friday Feature. I normally make my own Christmas cards to send out, but every few years, I just don't get them done. This was one of those years. As an alternative, I decided to send out a some New Year cards. Since this is the only paper crafting I've done this week, other than a couple of cards for my class next week, I thought I'd share it with you. It's a very simple card, since I was making a bunch of them.
My card base is light aqua and the sun and hill both started as white card stock. Along the top and sides of the card base, I sponged turquoise and blue to give the look of the sky just starting to lighten at sunrise, with that lighter glow around the sun.
The sun is Spellbinders lotus pendant die. To make it easy to release the card stock from the die, I used wax paper between the die and card stock. I then added mustard seed and spiced marmalade distress inks to the sun with a sponge applicator.
For the snowy hill, I cut a curve freehand and then embossed the piece with musical flourish embossing folder from Provo Craft. I added light aqua ink to highlight the raised embossing.
I glued on the sun and hill, and trimmed off the excess hanging over the edge. The sentiment (SU) is stamped in jet black archival ink.
Some of the products used can be found at Outlaw Women Scrapbook Emporium.
I want to wish you all a Happy New Year, and, as the sentiment inside my card says, "
My card base is light aqua and the sun and hill both started as white card stock. Along the top and sides of the card base, I sponged turquoise and blue to give the look of the sky just starting to lighten at sunrise, with that lighter glow around the sun.
The sun is Spellbinders lotus pendant die. To make it easy to release the card stock from the die, I used wax paper between the die and card stock. I then added mustard seed and spiced marmalade distress inks to the sun with a sponge applicator.
For the snowy hill, I cut a curve freehand and then embossed the piece with musical flourish embossing folder from Provo Craft. I added light aqua ink to highlight the raised embossing.
I glued on the sun and hill, and trimmed off the excess hanging over the edge. The sentiment (SU) is stamped in jet black archival ink.
Some of the products used can be found at Outlaw Women Scrapbook Emporium.
I want to wish you all a Happy New Year, and, as the sentiment inside my card says, "
May
God
bless
this trip
around
the sun
with
joy and
many
amazing
moments.
Thanks so much for stopping by today.
Friday, December 28, 2012
Friday Feature - enjoy the journey
Hi friends. It's Melody with a Friday Feature for you. With all the family things going on for Christmas, I didn't get a chance to sit down and create until today, so I'm a little late posting.
My project today is a tag that could be attached to a gift. I started with a pre-cut tag and swiped some distress stains onto it -- peacock feathers, ripe persimmon, and wild honey. While that was drying I die cut a rosette from some pattern paper and put it together with hot glue. I love how the geometric pattern on the paper changes when formed into the rosette.
I stamped the tag with Dylusions stamp set, around the edge, in jet black archival ink and colored in the leaves with shabby shutters and crushed olive distress markers. Then I added some vintage photo distress ink with a foam ink applicator and distressed the edges with a distressing tool.
On a piece of ivory card stock, I stamped the sentiment from a Tim Holtz set, just thoughts, and cut it into a flag shape, adding vintage photo distress ink and distressing. I attached this piece to a black flag with my tiny attacher. I pierced lines along the top and bottom.
I used a strip of black card stock and punched several 7/8" circles, which I cut in half and added along a couple of the edges of the tag. I decided to use the negative piece as well, tucked in behind the sentiment.
To help the rosette stand out a bit, I cut two black squares and offset them behind the rosette. Both the rosette and the sentiment piece are attached to the tag with dimensional foam tape.
My tag just wasn't complete without a butterfly, so I dug one out of my stash of die cuts (Tim's mini butterflies movers & shapers die), and added it to my tag.
The tie is made from black cord.
Many of the products used on this project can be found at Outlaw Women Scrapbook Emporium.
Thanks so much for stopping by.
My project today is a tag that could be attached to a gift. I started with a pre-cut tag and swiped some distress stains onto it -- peacock feathers, ripe persimmon, and wild honey. While that was drying I die cut a rosette from some pattern paper and put it together with hot glue. I love how the geometric pattern on the paper changes when formed into the rosette.
I stamped the tag with Dylusions stamp set, around the edge, in jet black archival ink and colored in the leaves with shabby shutters and crushed olive distress markers. Then I added some vintage photo distress ink with a foam ink applicator and distressed the edges with a distressing tool.
On a piece of ivory card stock, I stamped the sentiment from a Tim Holtz set, just thoughts, and cut it into a flag shape, adding vintage photo distress ink and distressing. I attached this piece to a black flag with my tiny attacher. I pierced lines along the top and bottom.
I used a strip of black card stock and punched several 7/8" circles, which I cut in half and added along a couple of the edges of the tag. I decided to use the negative piece as well, tucked in behind the sentiment.
To help the rosette stand out a bit, I cut two black squares and offset them behind the rosette. Both the rosette and the sentiment piece are attached to the tag with dimensional foam tape.
My tag just wasn't complete without a butterfly, so I dug one out of my stash of die cuts (Tim's mini butterflies movers & shapers die), and added it to my tag.
The tie is made from black cord.
Many of the products used on this project can be found at Outlaw Women Scrapbook Emporium.
Thanks so much for stopping by.
Tuesday, December 11, 2012
December Tag
I've made a bunch of tags so far this month. I challenged myself to make a tag a day for 12 days after making 2 tags for 2012 December.
Today, I'm sharing one of those tags here on Crafting with OWSE.
I inked the music stamp on #8 manila tag with black ink and then sprayed it with perfect pearls. Set this aside to dry.
On trimmed manila, stamp Christmas Carols with archival black, immediately add clear embossing powder, pour off extra and heat set to glossy finish. Festive berries inked applicator was used to color piece. Sprinkle with water and heat dry.
Apply Christmas Carols to tag with glue n' seal. Use distress tool around outside of tag and then use inked applicator to color edges.
Ink trim with festive berries, wad up and heat set to dry. Add to top of tag, string gold bell with gold thread and then tie to trim.
Many of the supplies can be purchased at discount prices in Club.
Today, I'm sharing one of those tags here on Crafting with OWSE.
I inked the music stamp on #8 manila tag with black ink and then sprayed it with perfect pearls. Set this aside to dry.
On trimmed manila, stamp Christmas Carols with archival black, immediately add clear embossing powder, pour off extra and heat set to glossy finish. Festive berries inked applicator was used to color piece. Sprinkle with water and heat dry.
Apply Christmas Carols to tag with glue n' seal. Use distress tool around outside of tag and then use inked applicator to color edges.
Ink trim with festive berries, wad up and heat set to dry. Add to top of tag, string gold bell with gold thread and then tie to trim.
Many of the supplies can be purchased at discount prices in Club.
Subscribe to:
Posts (Atom)
